Scopes and Filters
- 18 Dec 2023
- Print
- DarkLight
- PDF
Scopes and Filters
- Updated on 18 Dec 2023
- Print
- DarkLight
- PDF
Article Summary
Share feedback
Thanks for sharing your feedback!
Findings are the vulnerabilities that are collected from your security vendor tools and presented in Seemplicity. You can approach the ingestion from two perspectives:
- Where in my organization are my Findings?
- Which kinds of Findings are in my organization?
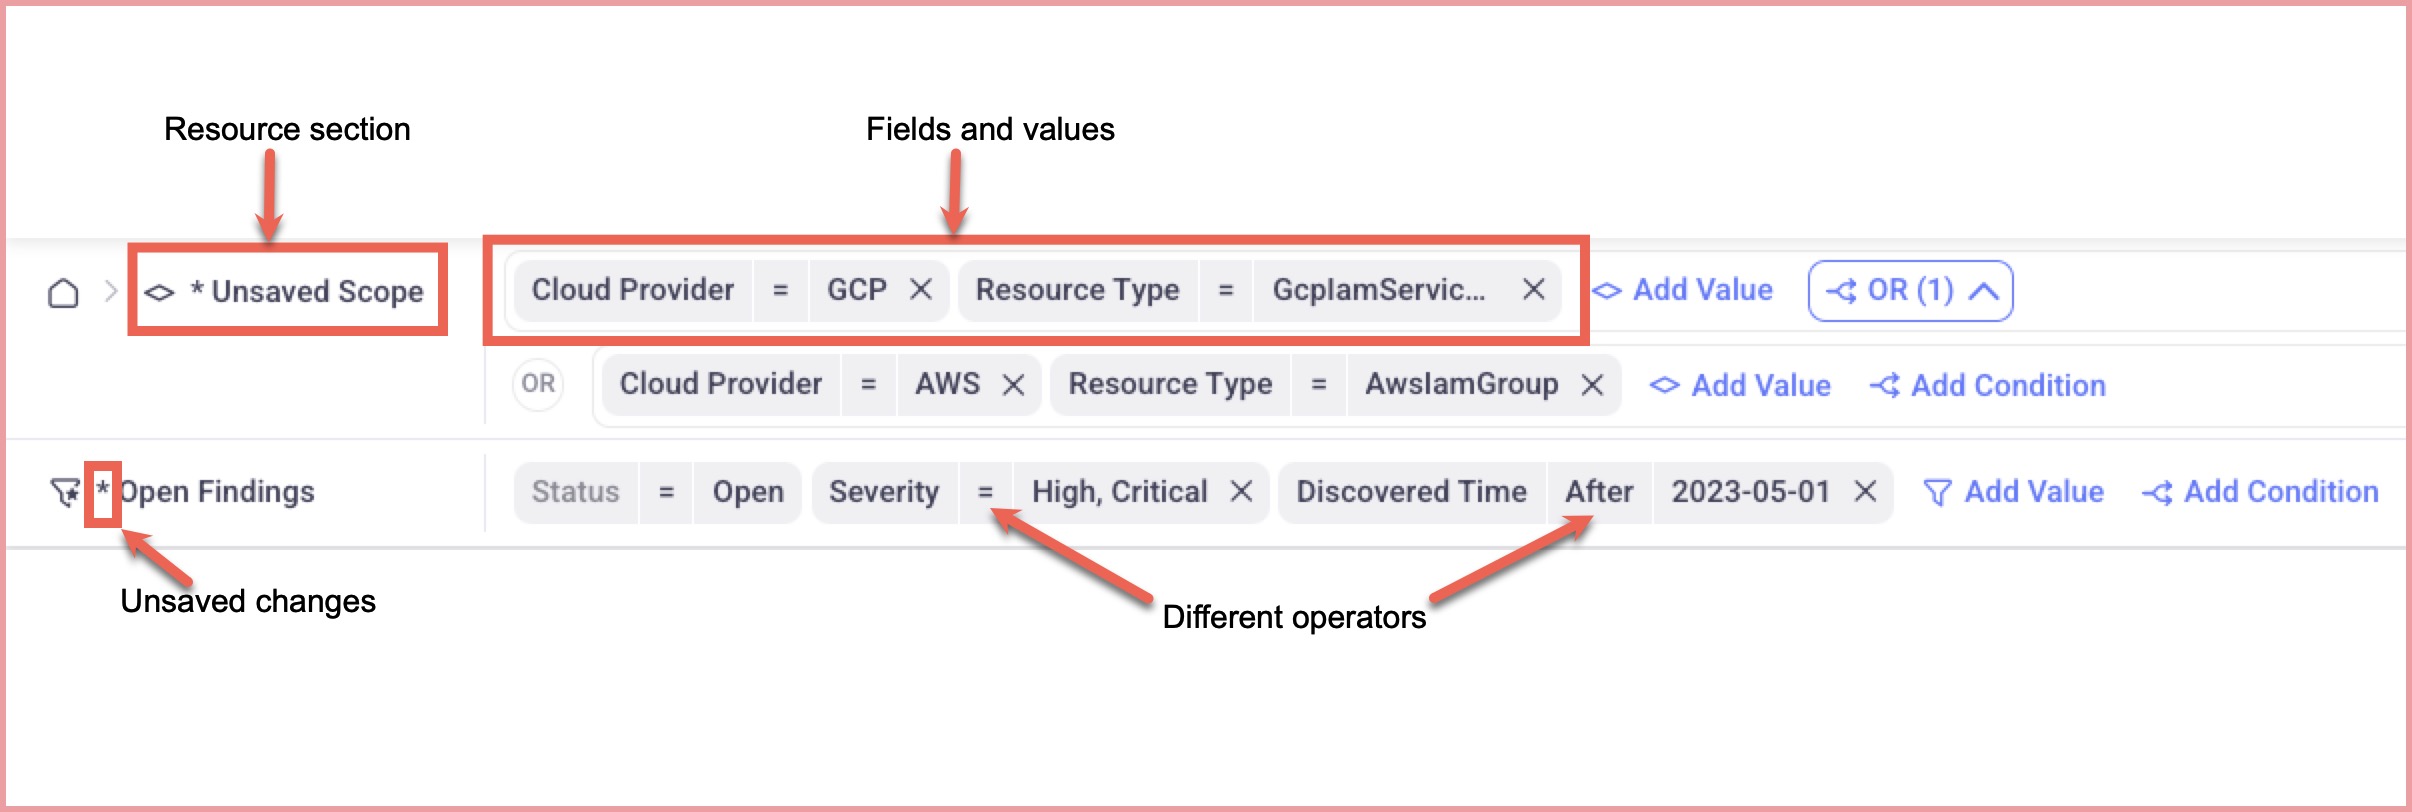
In Seemplicity, Scopes are used to define the Where/Location, and Filters are used to define the Which/What.
In this section, we will discuss
- What Scopes and Filters are
- How Scopes and Filters complement one another
- What are the differences
Scopes
Scopes define the resources (organizational segments), from which you want to retrieve Findings. Scopes are generally defined as one of the following:
- Environment - scopes based on the environment type. You can differentiate between your production and development environments.
- Organizational structure - scopes based on the different teams in your organization. For example, you could have a scope for all the resources in your R&D, DevOps, and others.
- Application type - scopes based on the different applications in your system. For example, a scope of all of the cloud applications, a scope for all of the web servers, and another for all of the developer tools. You could also create a Scope for all Findings related to the storage in your Azure accounts.

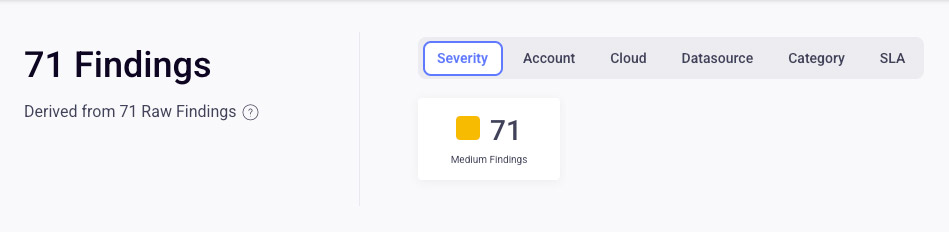
Let's consider the scenario above. You're only concerned with the resource on which the Findings were found. You would see you have results similar to the following:
Furthermore, you can create a Scope that presents Findings from multiple resources. For example, in addition to the Findings related to GCP that we see below, we also want the Scope to include Findings from AWS database servers.

This scenario would result in a slightly larger amount of Findings because we are now showing Findings related to either GCP S3 OR AWS database servers.
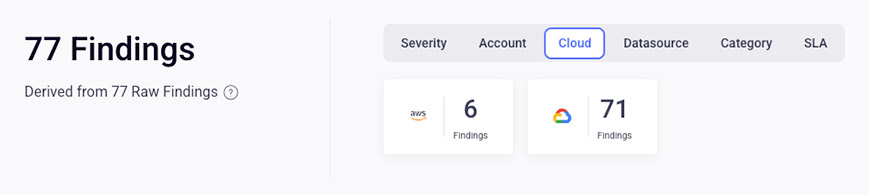
By clicking on the Cloud option, we can view the division according to its resource. However, in both of the scenarios presented, the Findings are displayed irrespective of their traits, such as severity, when they were found, or anything else.
Once you've decided on your scope values, you can save the Scope.
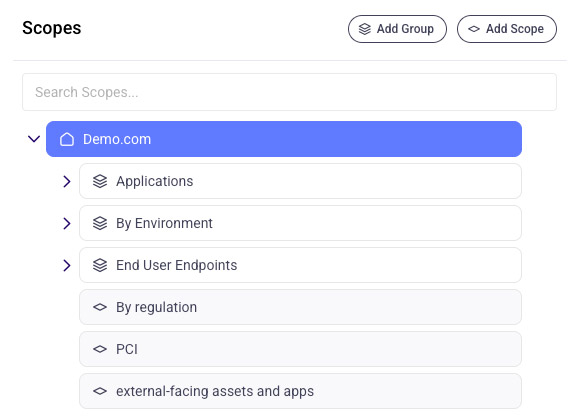
Groups and Scope Hierarchy
Groups are logical folders in which you place your resources. Generally, you will create your groups based on one of the philosophies mentioned above (Where and What). For example, in the following configuration, the groups have been defined primarily based on their purpose. End user machines are in one group, application servers in another, and there’s a third group to differentiate between production and development environments.
These Groups are what enable you to create the Scope hierarchy to organize your scopes. When you create a scope, you can determine the location in which the Scope belongs. So, in our example of a Scope for GCP or AWS, you would save the Scope in the By Environment location.
Conditions
Conditions are used to tailor the scopes to the exact resources you want. For example, you can search for all Findings related to the S3 buckets in your GCP accounts.
Conditions use the following logic:
- Within a condition AND logic is applied, so that findings are returned only if both statements evaluate as True. In our example, only Findings that are related to your Cluster AND are from AWS will be returned.

- You can also create a scope that consists of multiple conditions. Between conditions, the OR logic is used. Meaning, findings are returned if either of the conditions evaluate as True. For example, in addition to the above, you add a condition with the following parameters:

Now, we have defined a Scope that returns all Findings that are either related to IAM Service from GCP, OR all Findings that are related to the database server from AWS.
Filters
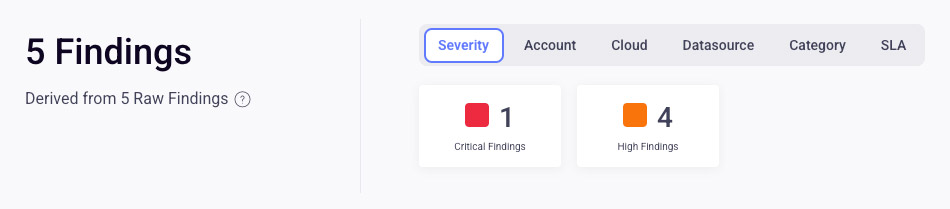
While Scopes focus on where in your organization the Findings are located, Filters enable you to define the characteristics of the Findings you want to display. For example, you might only be concerned with Findings that have a severity of High or Critical and were first seen over the last n days.

In this scenario, you will see results similar to the following, irrespective of where in your organization these Findings are located.
You can filter for different traits in the system. For example, Ticket Status, Last Reported Time, and more. Under Additional Data, you have criteria such as Exploit Maturity, meaning, is there an exploit available in the wild for the vulnerability in question. You can filter by CVE to see if you are exposed to a given vulnerability.
Once you've decided on your filter values, you can save the Filter.
Working with Scopes and Filters
While the focus in your organization might be where or which Findings, we recommend the following approach: use Scopes and Filters to complement one another.
For example, you might be focused on the Findings in the cloud environments we mentioned earlier, but you prefer to view only the ones that are on public-facing resources.
You might be interested in all of the Critical and High Findings in your organization, but want to focus on those located in your production environments.
Operators
When creating the Scopes and Filters, you can apply different operators to the fields and values you select. By default, resources are matched using the = operator. For added flexibility, you can click the operator and change the value to != or Like.
For example, you might want to view all Findings after Jan 1, 2023, or where SLA remaining time is less than a week.
Create a Scope
You can create Scopes from the Dashboard, Findings or Resources pages.
In the upper left-hand corner of the Dashboard, Findings, or Resources page, click the current Scope (a horizontal diamond icon displays next to the name).
Click Add Scope.
You can type in the search bar to find and select the resources you want to include in the Scope or add a parameter to see all of the resources available for that selection.
Select the checkbox beside each resource you want to include in the Scope.
(Optional) Click Add Condition to fine-tune from which resources you are ingesting the findings. You can add multiple Conditions. See Conditions.
(Optional) Click Open Findings (Dashboard and Findings pages) or Filter By (Resources page) to add a Filter to fine-tune which Findings are presented.
(Optional) To recall these settings at a later time, hover your mouse at the right end of the bar, click Save As or Save.
Create a Filter
You can create Filters from the Dashboard, Findings or Resources pages.
In the Filter bar, click Add Value.
Select the Filter field on which you want to filter, and the respective value(s).
Select the checkbox beside each resource you want to include in the Scope.
By default, resources are matched using the = operator. However, you can click the operator and change the value to != or Like for additional flexibility.(Optional) To recall these settings at a later time, hover your moust at the right end of the bar, click Save As or Save.